


Hi everyone!!
Look this amazing card, I found it on the web and did it immediately! Isn't it beautiful?!
The best part is that you can do it really quickly.
I made the next tutorial for you! (The green text is in english, the black one is in spanish). Hope you like it!
The original idea is from Angie.
Buen día, niñas! Miren esta maravilla de tarjeta! Me la encontré en la web, y la hice de inmediato! A poco no está hermosa?! Y es rapidísima de hacer (lo cual me encaaaanta). La idea original es de Angie.
Quieren saber cómo se hace? Les hice un tutorial, espero lo disfruten, y me cuenten si les gustó. El texto en verde es en inglés, y el negro es en español.Look this amazing card, I found it on the web and did it immediately! Isn't it beautiful?!
The best part is that you can do it really quickly.
I made the next tutorial for you! (The green text is in english, the black one is in spanish). Hope you like it!
The original idea is from Angie.
Buen día, niñas! Miren esta maravilla de tarjeta! Me la encontré en la web, y la hice de inmediato! A poco no está hermosa?! Y es rapidísima de hacer (lo cual me encaaaanta). La idea original es de Angie.


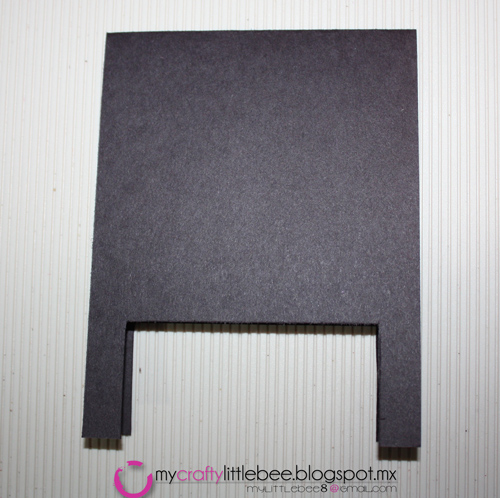
The first thing you have to do, is cut a piece of black cardstock 4-1/4 x 11", and fold in half.
Lo primero que tienen que hacer, es cortar un pedazo de cartulina negra 4-1/4" x 11". La doblas a la mitad.

To make the legs of the blackboard: draw a line of 1-1/2" long, on the open end of the card (opposite side from the folded line that you just did), from 0 to 1/2" on each side, as showed in the picture above. Join the 2 vertical lines at the top by a horizontal line, to make the blackboard shape. Follow the picture above. Cut over those lines, like the next picture.
Para hacer las patitas del pizarrón: Marcas por la parte que se abre de tu tarjeta (la parte opuesta al dobles) 1/2" de cada lado, por 1 1/2" de alto, tal como te lo marco en la foto superior. Y unes con una línea horizontal las dos líneas verticales en su parte superior para formar el pizarrón.
En la foto inferior te muestro como queda tras cortarla.
Now, cut a light brown card stock to 4-1/4"x 5-1/2", stamp it with a woodgrain background stamp, with a brown ink. (In this case I used a hero arts stamp).
Ahora, tomas una cartulina de color café claro o medio, y lo cortas a 4-1/4" x 5-1/2" y lo estampas con un sello que tenga forma de madera.


Yo tomé como molde la base de la tarjeta negra ya cortada, para cortar el marco del pizarrón. Primero empiezas a cortar las líneas verticales de 1/2". Te va a sobrar un pedazo de cartulina café claro más chico, justo del ancho de las líneas horizontales. Que deben ser de 1/2"x 3-3/16"

The next step, is to stamp a sentiment according to the occasion, over the black card stock (the card base), you can use versamark ink, and emboss it. Then, with a soft tissue, or sponges, apply white craft ink with circular motion over the black area you want to stain, so it looks like it has been previously erased.
Do you remember those chalkboards? There were green ones and black ones, and when you cleaned them up, you finished all cover with that white powder (chalk dust).
Well, that's the effect we want to create.
You can also write the sentiment with a white pencil, in this case, I draw some lines around the blackboard.
Decorate as you wish.
I used stamping up papers (everyday enchantment), punches (mini label from SU, and Daisy and Petunia from ek success), and stamps (Beautiful birthday).
Isn't this technique fun?
Hope you enjoy this tutorial!
TGIF!!
Have fun and enjoy with your families!

El siguiente paso es estampar alguna frase o mensaje adecuado a la situación.... y con un pañuelo suave, le pones un poco de tinta blanca con movimientos circulares muy delicados para manchar un poco la parte negra de tu pizarrón y darle ese efecto de pizarrón que ha sido borrado con anterioridad.
Te acuerdas de esos pizarrones? Había negros y verdes... y cuando los borrabas, terminabas toda llena de polvito blanco? Bueno, pues el chiste es darle ese efecto.
A poco no está divertidísima?!! Yo se la pienso regalar a la teacher de mi bebé, que cumple años en abril. Estoy segura que le va a encantar!!!
Espero que te haya gustado este tutorial!
Graaaacias a Dios es viiiiiernes!! a divertirse y disfrutar con sus familias! =)