Hola a todas!!! Se acuerdan de mi post del 2011: Santa Claus is coming to town? Bueno, si no lo recuerdan, esto fue lo que les presenté.
At that time it was not possible for me to make the tutorial, but here I am with the instructions to make Mrs. Claus little box... and at the end of the post, there's a link to a .studio file, if you want to cut it with your silhouette.
Hope you like it!
En ese entonces no me fue posible hacer un tutorial, pero aquí estoy de nuevo con las instrucciones para hacer la cajita de la señora Claus.... al final del post podrán encontrar un link con el archivo .studio, por si la quieren recortar con su silhouette.
Espero les guste!
Instructions:
Cut a 11-3/4 x 5-5/8" piece of red cardstock.
Now accross the long width Score at 2- 3/4”, 5 ½”, 8-1/4”, 11”.
Next Score 3 “ from bottom of the cardstock.
Using scissors or trimmer, cut the short lines from
the bottom to the mid line.
If you are using my template, just cut out the solid
lines and score at dotted lines. Apply glue or scor-tape to the diagonal lines
on my template, and tape it down.
Cut two strips 1/2” X 7-1/2”out of white cardstock,
to create de suspenders.
Add the suspenders to the box by applying adhesive to
the back side of each suspender at the bottom edge. Apply adhesive to the
opposite end of the suspenders on the front side bottom edge.
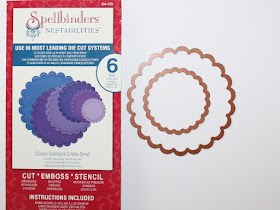
 For the apron, I used spellbinders nestabilities dies
(the 3rd, and the 6th largest one). But you can use any
scallop punch. The bib measures 4” diameter. Tape the apron down, just in the
center of the bib, overlapping them on the back of the bib. The apron should be
created with a 2-3/8” scallop circle.
Apply decorative stitching along edges of the little box.
Tape a taffeta ribbon around the box, as it was a
belt.
Punch out some hearts to decorate.
Instrucciones:
Corta un pedazo de cardstock rojo de 11-3/4 x 5-5/8"
Ahora, marca tus dobleces en el lado ancho de tu cardstock en 2- 3/4”, 5 ½”, 8-1/4”, 11”
Ahora gira tu cardstock y marca el doblez en la pulgada 3. Tal como lo muestro en el primer archivo que te proporciono arriba.
Usa tus tijeras o una guillotina para hacer unos cortes verticales hacia la línea del doblez. Si estás utilizando mi template, corta sobre las líneas sólidas y marza dobleces sobre las líneas punteadas. Aplica adhesivo, ya sea pegamento o cinta doble cara, donde están las líneas verticales de mi template, y ármalo.
Para crear los tirantes, corta dos tiras de 1/2” X 7-1/2 de cardstock blanco. Pega los tirantitos a la caja, colocando cinta adhesiva o pegamento en la parte trasera del final del tirante, para pegarlo a la parte trasera de la caja, y aplica pegamento en el lado opuesto del tirante, pero ahora de la parte delantera, para pegarla al mandil por la parte de arriba.
Para el mandil, utilicé un suaje de spellbinders nestabilities (el primero y el sexto, de chico a grande). Pero puedes utilizar cualquier perforadora con forma de scallops. El mandil mide aproximadamente 4" de diámetro (es que que vas a pegar encima de la caja). Para el baberito (o pechera) utilicé el tercer tamaño de suaje (que mide 2-3/8”). Una vez cortada, pega la pechera o baberito por la parte interna de la caja justo en el centro, superponiendo la parte inferior de la pechera, con la parte superior interior de la caja.
Dibuja o coce unos pespuntes alrededor del borde de toda la caja.
Coloca listón alrededor de la caja, como si fuera su cinturón.
Recorta unos corazoncitos y decora.
Para todas aquellas que tienen la silhouette cameo, Elke generosamente compartió conmigo este archivo .studio file que hizo para recrear mi cajita! Muy amable de tu parte Elke! Está padrísimo, porque ahora tendrás dos opciones para recrear esta cajita, de manera manual o usando una cortadora eléctrica!! (solamente da click en la liga para descargarlo).
Don't forget to visit our Facebook pages, and spread the love giving us a like!
And mine is this: My Crafty Little Bee
Enjoy!
No olviden visitar nuestras páginas de fan de facebook, y compartir un poco de amor regalándonos un like!
Su página de facebook es: https://www.facebook.com/PAPERNSVGCRAFTYME?ref=hl ella tiene muchas cosas interesantes que ha hecho.
Y la mía es: My Crafty Little Bee
Que lo disfrutes!


ah me encanta la cata de sra clau esta divina gracias por compartir el patron felices fiestas :)
ResponderBorrar